This is a part of my
second short series about JavaScript MVC Frameworks. In this part I'll
show you a real-life AngularJS App (albeit a simple one) and explain all
relevant parts so that you can create your own. I've split it into multiple
posts - this one explains all the angular magic in the HTML-View, while the
other posts focus on the Controller, Model and more.
If you have not
already read the previous parts, I would highly recommend you start there:
1.1 Why you need JS MVC,
1.2 Why Angular beats knockout,
1.3 Views and Templates and
1.4 Learn AngularJS Fundamentals in 70min.
Prerequisites
To learn AngularJS
you will have to get your hands dirty. So go ahead and install DNN with 2sxc as explained in this post and install this demo-App containing all the code explained here.
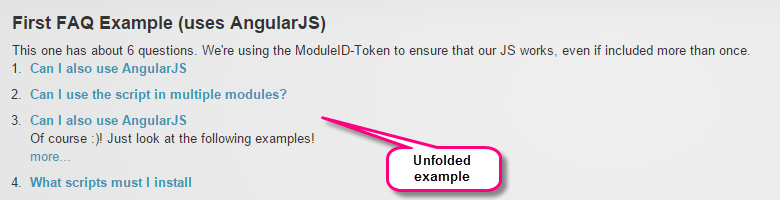
Looking at the App Output
I will use the same
JS Framework Demo-App demonstrating various Binding methods, because the
included example is very simple. I've enhanced the solution to use more
AngularJS features. So this is the output for the end user:
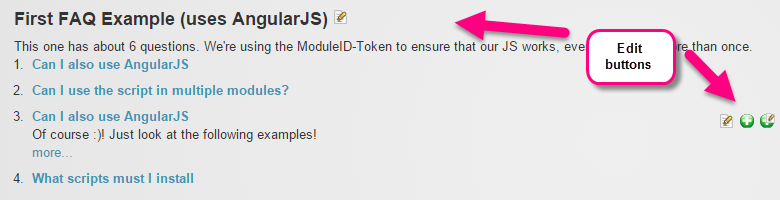
And this is what the
editor sees
If you visit the
demo (second module on the demo page here) todo:link or if you installed the
app in your DNN, you'll see that there is a small delay before the items
appear. This is because the questions are being loaded using JSON provided by
2sxc.
Discover /
Understand the Code
Let's look at the
code, and discover what each part does.
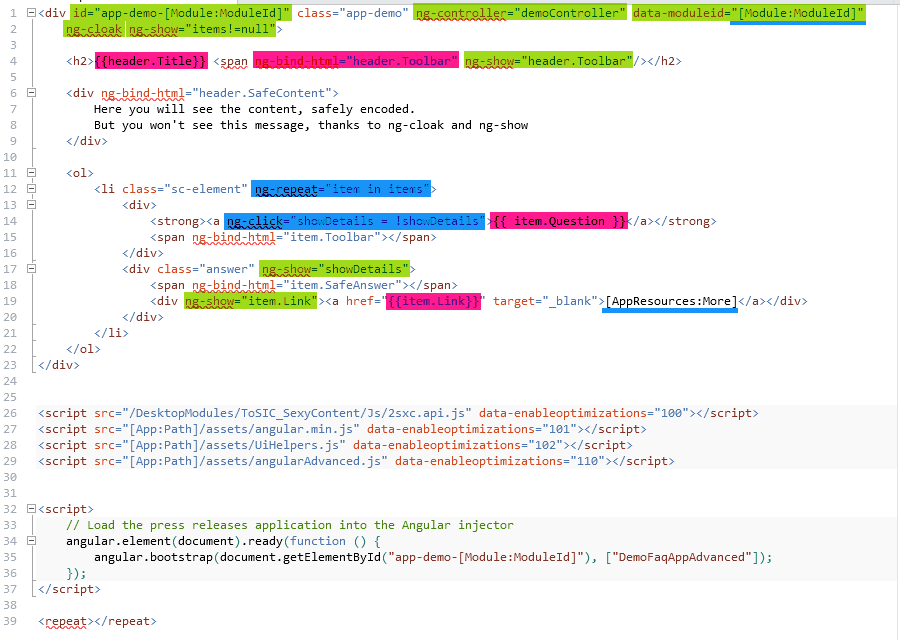
The HTML-View
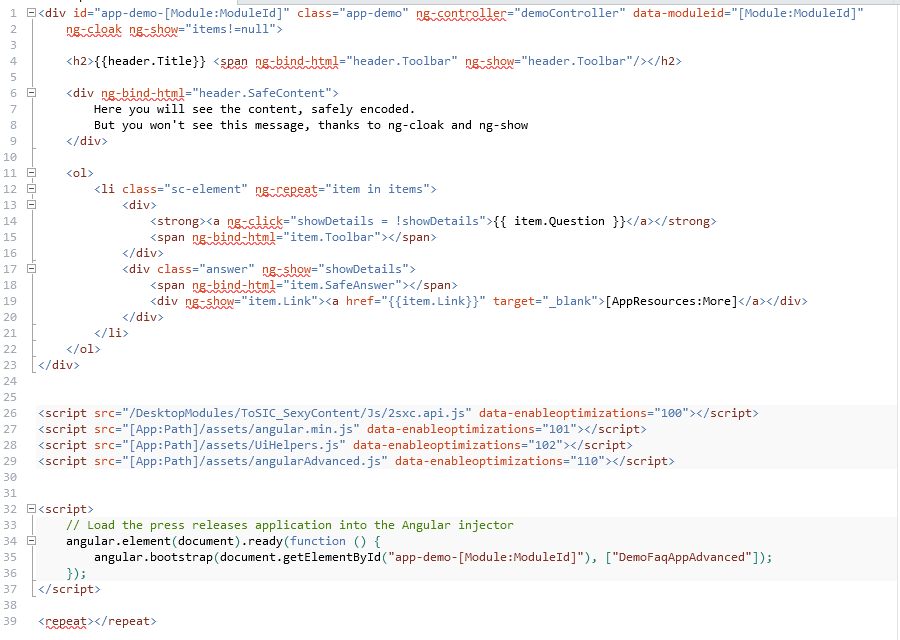
This is what each
part does
- Green: the AngularJS template
-
Pink: important scripts to
include
- Blue: initialization script
Let's dig deeper
The features you see
here are
-
id="app-demo-[Module:ModuleId]":
this will give the app a unique Id. This is important because we often
don't have SPAs (Single Page Applications) but more like MAPs (Multiple
Applications per Page). So with this, we'll ensure that the server token
engine will replace the [Module] token and create an
app-demo-17 or something.
-
data-moduleid: this is the
moduleid - ready for AngularJS to use
-
ng-cloak: this will hide the
template till Angular has been loaded. Otherwise the end-user may see
unsexy placeholders like {{header.Title}} and similar.
-
ng-show: this will also hide the template - after angular was loaded, before data (items) are loaded
-
ng-controller: this tells
AngularJS which controller is to be used (it's in a separate file)
-
{{variable}}: is the
data-binding syntax for simple stuff
-
ng-bind-html: is for
data-binding raw HTML. This only works if the HTML was marked safe in the
controller (read more about the $sce if you're interested)
-
ng-repeat: is like a foreach
loop
-
ng-click: a small
JS-expression which runs when clicked. Our simple showDetails =
!showDetails will just switch that state back and forth from true/false
whenever clicked (and this change will affect visibility of details
below).
-
ng-show: will show/hide this
tag and it's contents if the value exists and doesn't return a false…
-
ng-show="showDetails"
will show the details if showDetails is true, not if it's null (initial
state) or false (later state)
-
ng-show="item.Link"
will show the tag if item.Link is something
-
Note that the [Source:Key] notation (blue underline) is resolved by DNN before AngularJS sees it. So AngulaJS doesn't get [Module:ModuleId] but 274 or something.
Features you don't see here
Many angular
examples will show you an ng-app attribute. They do it, because it's easier to
show you some demos that way, but it assumes that there is only 1 angular app
on your page. In DNN, this will normally not be the case, because every module
can be an app, and 2sxc also creates a few app of their own for the edit-UI.
Since we have MAPs (Multiple Applications per Page) the ng-app doesn't work.
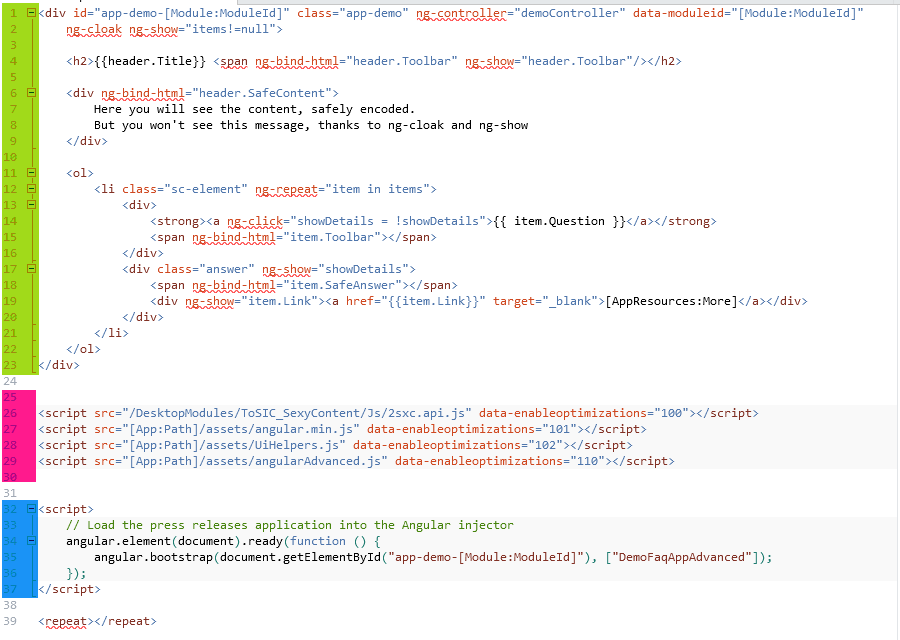
Initialization of the App
angular.bootstrap is
the command you need to initialize one or more apps manually. This is what we
use instead of ng-app because we don't have a SPA (Single Page Application) but a MAP (Multiple Applications per Page). To really understand the Initialization takes a bit more to explain - this will be part 2.4 of my blog series. In brief - this is what happens: On ready, angular
will…
-
Look for the DIV where the
entire app is hosted (and in our case, also contains the templates)
-
But before it does this, it
will check if all dependencies are loaded - specified in the array
["DemoFaqAppAdvanced"]. So AngularJS will ensure the proper
loading-order :)
-
Retrieve that app and look at
the ng-xxx things
-
It will then get the
controller by the name demoController as specified in ng-controller…
-
...and initialize that controller
That's the entire
sequence. Of course, the controller will then do the init (typically retrieving
JSON data or something) and then bind the viewmodel (within the $scope) to the
placeholders. We'll cover the controller in the next post.
You must get your hands dirty!
Reading this won't make you smarter if you don't try it yourself. Just use 30 minutes to download the App, make some adjustments (like adding fields or changing the JS-effects). That way you'll get smart really fast!
With love from Switzerland,
Daniel